Changelog
Follow up on the latest improvements and updates.
RSS
We’ve officially moved our changelog to a new home!
Going forward, all feature updates, product improvements, and release notes will live on our new changelog:
This move gives us more flexibility to organize updates, showcase what’s new more clearly, and keep you in the loop with everything we’re building.

We're excited to announce a significant update to Rize's auto-tagging feature, making your time tracking even smarter and more effortless!
Overview
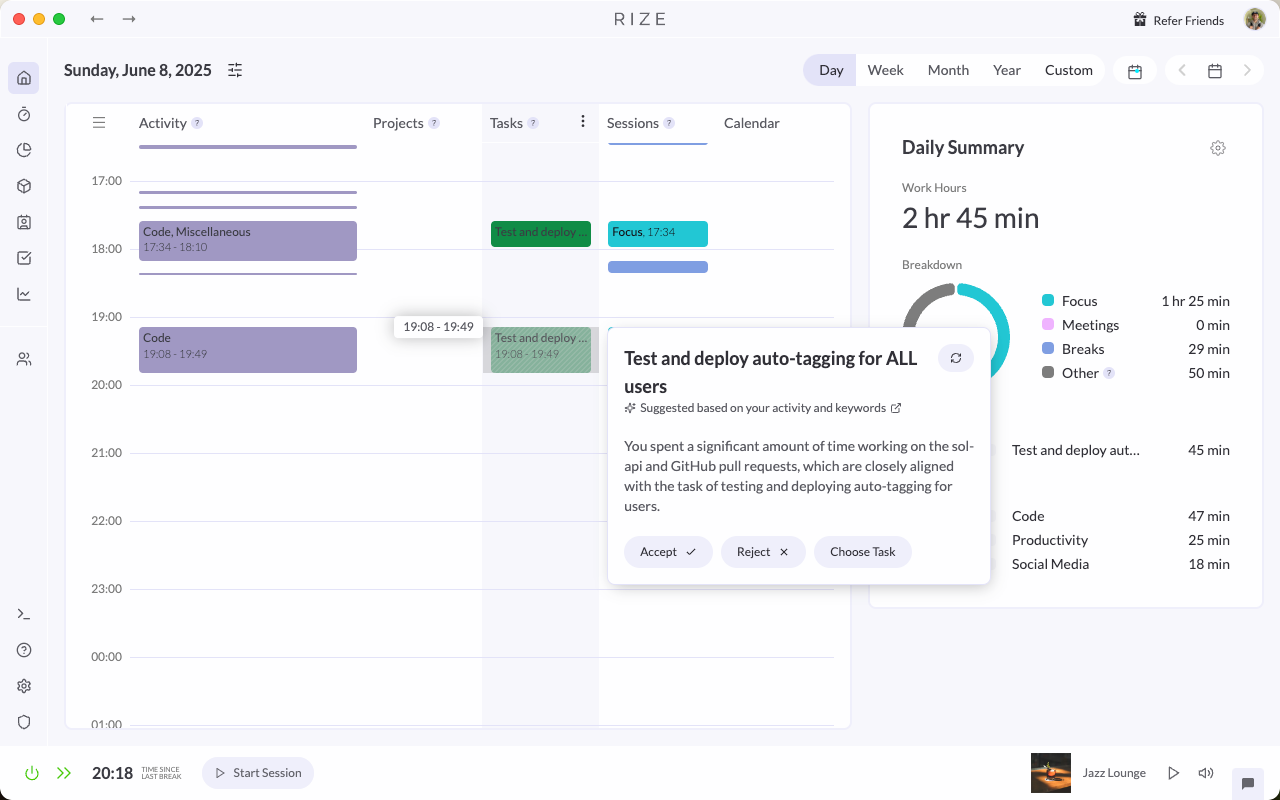
Rize can now create and tag AI-Powered time entries for Clients, Projects, and Tasks.
This will massively streamline how you tag and report your time. Rize analyzes your activity to automatically generate suggested time entries, complete with descriptions and tags to the most relevant Client, Project, or Task. This works especially well with our integrations, automating your time tracking for projects and tasks that you’ve synced with ClickUp, Linear, or Zapier.
Rize will automatically present you with time entry suggestions. You can also prompt them by dragging and dropping on your timeline and selecting "Auto-tag Entry". For each suggestion, you have a few options:
- “Accept” which will create the time entry.
- “Reject” which will delete the suggestion.
- “Choose project” which allows you to choose the specific Client, Project, or Task.
- “Regenerate” which will fetch a new suggestion.
Learning and Improving Over Time

The best part is that Rize learns and improves the more you use it. When you accept an auto-tagged entry, Rize automatically extracts keywords and adds them to the custom keywords associated with that Client, Project, or Task. This process continuously refines Rize's ability to auto-categorize and tag your future activities with greater accuracy.
You can view the keywords associated with a Client, Project, or Task by clicking “Edit Project”, then going to the “Automatic Tracking Keywords” section. Here you can manually add more keywords too.
Convenience and Control

We understand the importance of flexibility and control. You can enable auto-tagging and customize its behavior in Settings > Coach, including:
- Configure Rize to generate time entries based on your activity automatically.
- Choose to review Rize’s entry suggestions before accepting or automatically accept and add auto-tagged entries to your timeline.
We're excited to see how this new AI-powered feature enhances your Rize experience. We encourage you to try it out and discover how it makes time tracking more accurate and less time-consuming.
new
Rize Teams
Rize’s new Teams feature makes it easier than ever to track time on activities where you are working with your team. You and your team members will be able to tag time to clients, projects, and tasks that are shared across your team, simplifying how you invoice your clients and giving you better insights into your team’s productivity.
Setting Up Your Team
Setting up your team is straightforward, and once you're in, you'll find it much simpler to keep track of everyone’s time on team projects, clients, and tasks.
To create a team, simply click
Teams > + Add Team
. Once you set a team name, a new section will be added under the Teams
navigation item with your team name, and you’ll be taken to the Team Settings where you can add or manage team members.
Invited team members will receive an email letting them know they’ve been invited to the team. They just need to accept their invite from their Rize dashboard, and they are ready to go!

We’ll also automatically update your subscription for new team members. Any team members added this way that were not a part of your organization will automatically be added to your org and will be charged based on a prorated rate.
Adding Team Clients, Projects, Tasks
Once you’ve created a team, admins can create Clients, Projects, and Tasks from the Teams Tab that all team members can use to tag their time
For example, if you’d like your team to tag their work for a specific project, you can create a team project from
Teams > [Team Name] > Project
. When any team member tags time to a project entry, the team project you created will be available as one of the options in the “Select a project” dropdown. The project will also display the team name that it’s associated with next to it.
Only admins can create Clients, Projects, and Tasks for their team. If other members of your team need admin rights, you can change a user’s role from
Teams > [Team Name] > Settings > Team Members
.Viewing Team Clients, Projects, Tasks
Just like your individual projects, clients, and tasks, each team member can see a roll-up of the time they’ve spent on a team’s clients, projects, and tasks from their respective tabs in
Teams > [Team Name]
. You can select between a weekly, monthly, or yearly view or choose a custom time range, if needed.Admins will see the activity of all their team members. They also have access to the Overview tab, which provides a summary of the entire team’s work across all team clients, projects, and tasks, and the Members tabs, which show a detailed breakdown of the work for each team member.
You can easily export this information into a .csv or .pdf if you need it for your invoicing or other record-keeping purposes.
Team Billing Settings
We’ve also added some options to give you flexibility on how you bill and invoice the work your team completes. In
Teams > [Team Name] > Settings > Billing Rate Strategy
, you can choose to bill using either your Team Member Hourly Rate or Client Hourly Rate.
If you choose Team Member Hourly Rate, the work done by each team member will use the individual hourly rate you’ve set for them in
Teams > [Team Name] > Settings > Team Members
. If you choose Client Hourly Rate, the work done by all team members will use the rate you’ve set for the Client in the “New Client” or “Edit Client” modals.We've been working hard on this new Teams feature, and we're really excited for you to finally get your hands on it! We think it's going to make a big difference in how you track time with your team. We encourage you to jump in, create a team, and see how it can help you and your team!
We’re excited to launch the first version of our ClickUp integration, allowing you to seamlessly sync tasks between ClickUp and Rize - and automatically post tracked time back into ClickUp.

How It Works
1. Connect ClickUp
Go to
Rize > Settings > Integrations
and click Connect ClickUp. You’ll be prompted to log in and authorize the integration.
2. Select Workspace(s)
Choose which ClickUp workspace(s) you want to sync with Rize. You can connect just one or multiple workspaces, depending on your needs.
3. View Synced Tasks in Rize
Once connected, your ClickUp tasks will appear in Rize under the Tasks section. You’ll recognize them by the ClickUp icon next to each synced task.
Currently, Rize only syncs tasks created by you or assigned to you.

4. Track Time Against ClickUp Tasks
Start tracking time in Rize as you normally would. Select or auto-track a synced ClickUp task - no extra setup needed.

5. Time Posts Back to ClickUp
Any time you track against a ClickUp task in Rize will automatically sync back to your ClickUp workspace as a logged time entry on that task, visible in your ClickUp timesheets and reports.

6. Keep Tasks Updated
You can’t edit ClickUp task names directly in Rize, but any changes made in ClickUp (like renaming a task) will sync back into Rize automatically.
What’s Next
This is just the first version of the ClickUp integration. We’re actively working on:
- A ClickUp Teams integration so entire teams can sync and track together
- More customization options for how tasks and time entries sync
Have suggestions or want to share feedback? We’d love to hear from you - just reach out to our team at support@rize.io.

We just launched a new collapsible sidebar in the dashboard!


You can now choose a custom date range for Client, Project, and Task reports. Just choose "Custom" and select the two dates. You export this range to CSV or PDF.

Here's a PDF export.


We’ve upgraded our PDF reports for
Clients, Projects, and Tasks
.Previously, only the first page of time entries was included in exported reports. Now,
all time entries are included
—no matter how many there are.You’ll still see:
- Total time, billable time, and billable amount
- Hourly rates and histograms
- Full descriptions and billable details for each entry
This makes sharing complete, professional reports with clients and teammates easier than ever.
We’ve made several UI improvements to help you easily understand what’s billable and how much you’re earning:

Currency Labels
: All billable time entries now display the Client’s currency
, including entries under related Projects and Tasks.
Entry Tooltips
: Hover over a time entry to see its billable amount and associated Client in the tooltip. In this case, the client is Peer and the billable amount is $27.03.
Client & Project Modals
: The left side of the histogram now shows total time
, billable time
, and billable amount
at a glance.
Client Reports
: Each time entry in the Client Reports view now shows its billable amount for quick reference.These updates make it easier to review, understand, and report on your billable time—down to the last dollar (or euro, or pound 😉).

You can now
mark specific time entries as billable or non-billable
across Clients, Projects, and Tasks.By default, time entries are considered
billable
for all Clients with an hourly rate. But sometimes, not all tracked time should be invoiced—now you have full control.Just edit any time entry and
toggle the billable field off
.That entry will still count toward the total tracked time for the Client, Project, or Task, but it won’t count toward billable hours.
More flexibility. More accurate billing. Less hassle.

We recently launched
Hourly Rates for Clients
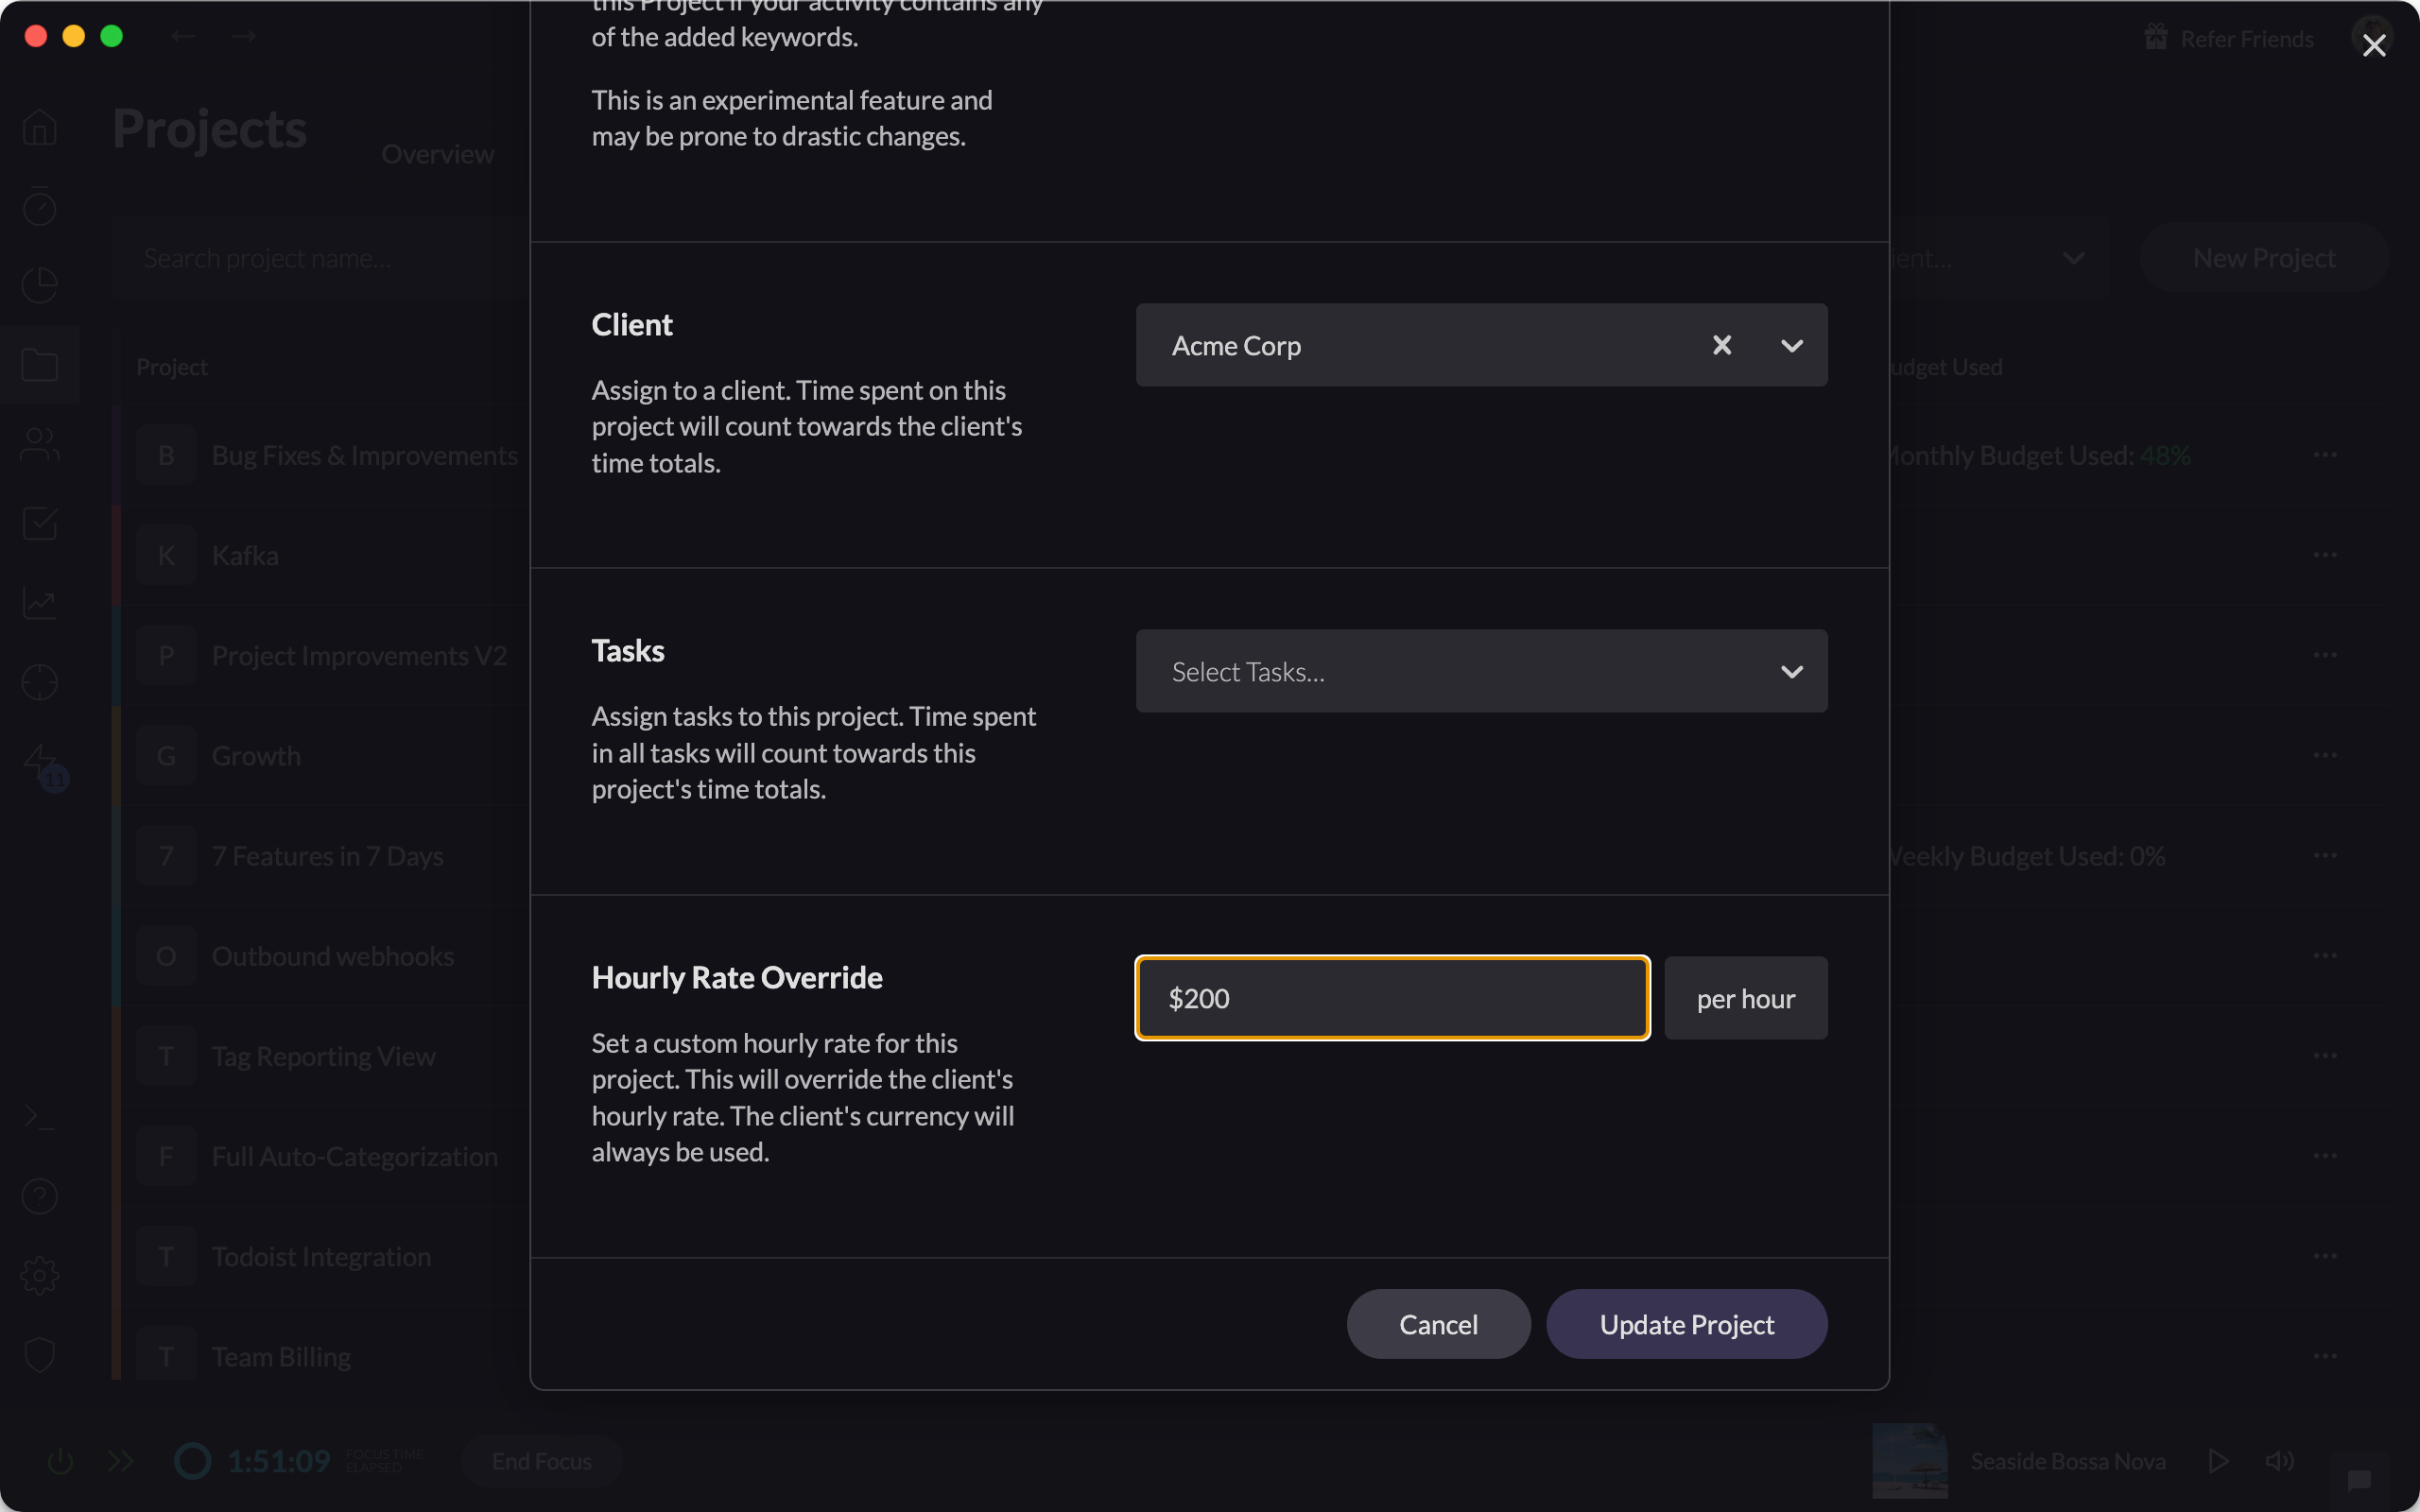
, making it easy to track billable time at the client level. But we know that sometimes, specific Projects have their own custom rates.Now, you can set
Custom Hourly Rates for individual Projects
.Just edit the Project and enter the override amount—Rize will automatically apply this rate when calculating billable time for that Project.
💡 Note: The Project will always inherit the currency from its parent Client.
We hope this makes Rize even more powerful and flexible for your workflow!
Load More
→